CRF 23 and +faststart: FFmpeg Commands and Checklist for Web Video


Export your web video as H.264 in an MP4 container, set CRF to around 23 with the medium preset, and add -movflags +faststart before you upload anything. That single combination handles video compression for the web in most real cases. Add a WebM or AV1 version alongside it when your audience uses modern browsers, since H.264 remains the safe universal baseline while newer codecs shrink files further for viewers who can decode them.
TL;DR:
Use MP4 with H.264 codec set at CRF 23 and include the -movflags +faststart flag for optimal web playback.
Create WebM or AV1 versions for browsers supporting modern codecs, but keep H.264 as the universal fallback.
Strip audio from muted, autoplay hero videos to reduce file size by approximately 20 percent, enhancing load speed.
Serve videos through a content delivery network and generate multiple resolutions to improve perceived loading times across devices.
Prioritize visual testing of at least three renditions before publishing, especially when using advanced codecs like AV1 or HEVC, based on audience device profiles.
Table of Contents
Quick Checklist for Web-Ready Video Files
Before touching any advanced settings, run through this list. It covers the decisions that matter most for file size and playback speed, in the order you’ll actually hit them during export.
Export MP4 (H.264) with CRF between 18 and 28, using 23 as your default starting point, and the medium preset for encoding speed.
Add -movflags +faststart to every MP4 export, without exception.
Create a WebM (VP9 or AV1) version for browsers that support it, and keep the H.264 file as a fallback.
Strip the audio track entirely from muted, autoplaying hero loops, which saves roughly 20% of the file’s bandwidth on its own.
Pick your preload attribute deliberately instead of leaving it on the default.
Serve everything through a content delivery network rather than your own server.
Generate at least three renditions (1080p, 720p, 480p) and actually watch them before publishing, not just check the file size.
If you’re producing video for a client site rather than just a personal project, this is also the point where planning a proper corporate video production workflow pays off, since export settings decided at the script stage save re-encoding later.
Choosing a Codec and Container: What Actually Plays Where
Codec choice comes down to one trade-off: compatibility versus compression efficiency. Every codec below trades one for the other, and none of them are lossless in any real deployment. You’re always choosing how much visible quality to give up, not whether to give any up.
H.264 is still the default because it decodes on essentially every device with hardware support, from a five-year-old Android phone to a smart TV. It’s not the most efficient codec anymore, but it’s the one that never breaks.
VP9 cuts file size noticeably below H.264 at the same visual quality and plays natively in Chrome, Firefox, and Edge. Safari support has historically lagged, which is the main reason VP9 rarely stands alone.
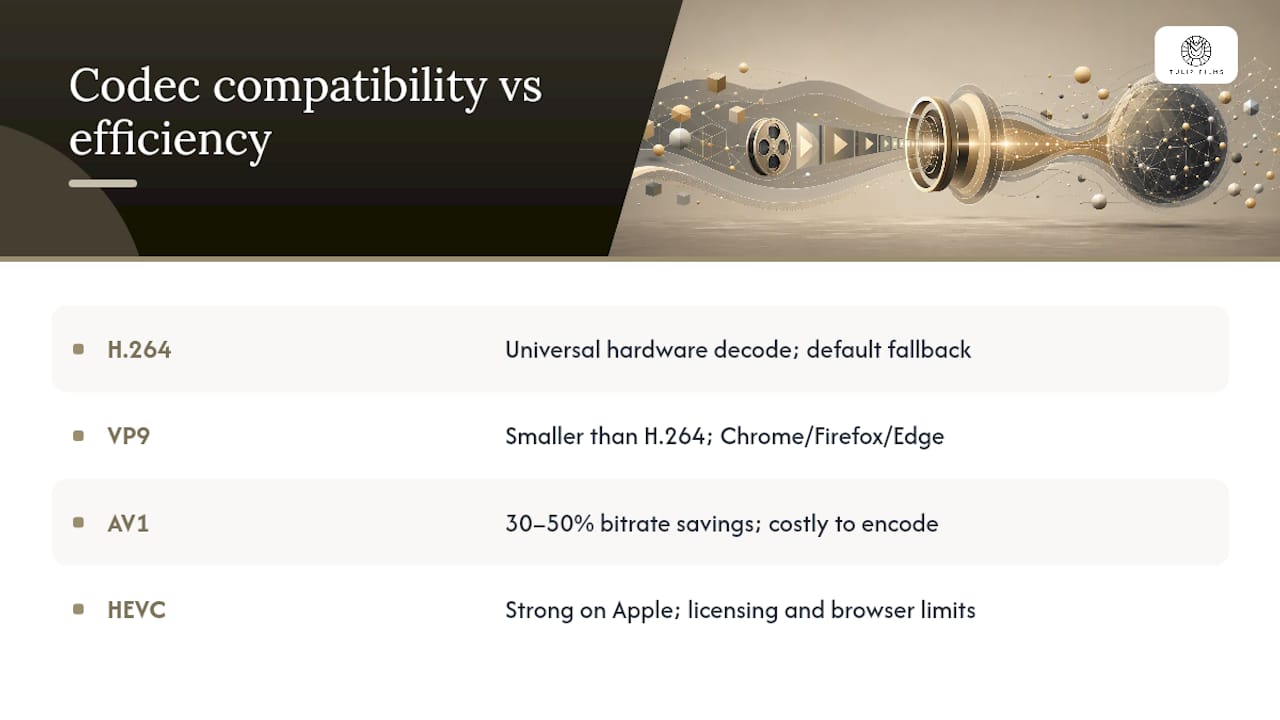
AV1 goes further still. It can save 30 to 50% in bitrate compared with H.264 at equivalent quality, but it costs meaningfully more computing power to encode, and older hardware may struggle to decode it smoothly without a capable GPU.
HEVC (H.265) occupies a narrower lane. It’s strong on Apple hardware and in controlled environments like internal corporate platforms, but licensing fees and inconsistent browser support keep it out of most public web delivery plans.
Codec reality check: there is no free lunch here. Every codec squeezes video by throwing away information the eye is less likely to notice. The goal is invisible loss, not zero loss.
The practical answer for most sites: ship H.264 as the guaranteed fallback, and add a VP9 or AV1 variant when the audience and CDN setup justify the extra encoding time.
Practical FFmpeg Commands You Can Copy Right Now
CRF (Constant Rate Factor) controls quality by targeting a consistent visual result rather than a fixed bitrate. Lower numbers mean higher quality and bigger files; higher numbers mean smaller files and more visible compression. The preset flag controls encoding speed versus compression efficiency, ranging from ultrafast to veryslow. A CRF around 23 with preset medium is a sensible starting point for web delivery, and you rarely need to stray outside CRF 18 to 28 for typical marketing or product video.
Here’s a standard H.264 export:
ffmpeg -i input.mp4 -c:v libx264 -crf 23 -preset medium -c:a aac -b:a 128k -movflags +faststart output.mp4
A WebM version using VP9:
ffmpeg -i input.mp4 -c:v libvpx-vp9 -crf 30 -b:v 0 -c:a libopus output.webm
An AV1 version, using the faster SVT-AV1 encoder rather than the reference encoder:
ffmpeg -i input.mp4 -c:v libsvtav1 -crf 32 -preset 6 -c:a libopus output.av1.webm
For a muted, autoplaying hero background, drop the audio entirely and lower the CRF slightly since viewers won’t focus closely:
ffmpeg -i input.mp4 -an -c:v libx264 -crf 28 -preset medium -movflags +faststart hero.mp4
Use two-pass encoding instead of CRF when you need a file to hit a hard size ceiling, such as an email attachment limit or a strict ad-platform cap. Two-pass analyzes the whole file first, then encodes to a target bitrate you specify, which is more predictable than CRF for size but slower to run. If you’re processing dozens of files, wrap these commands in a shell script or a simple batch loop so every export uses identical settings. Hardware acceleration, through NVENC on NVIDIA GPUs or VideoToolbox on Apple Silicon, cuts encoding time dramatically for H.264 and HEVC, though software encoders like libsvtav1 still generally produce tighter files for the same quality.
Delivery Details That Change How Fast Video Feels
File size is only half the story. Two videos of identical size can feel completely different to load depending on how you serve them.
movflags +faststart relocates a MP4 file’s metadata to the front of the file instead of the end, where most encoders place it by default. Without it, some browsers wait for the entire file to download before starting playback at all. With it, playback can begin the moment enough data has arrived. This one flag has an outsized effect on perceived speed relative to the effort it takes to add.
The preload attribute deserves more thought than most people give it:
preload="none" for videos far down the page or behind a click, so you don’t waste bandwidth on content nobody may watch.
preload="metadata" for a reasonable middle ground, fetching just enough to show duration and dimensions.
preload="auto" only for a hero video the visitor will almost certainly watch immediately.
Pro Tip: Pair every autoplaying hero video with a poster image and the playsinline attribute. Without a poster, the browser shows a blank frame while loading, which reads as a broken page on a slow connection.
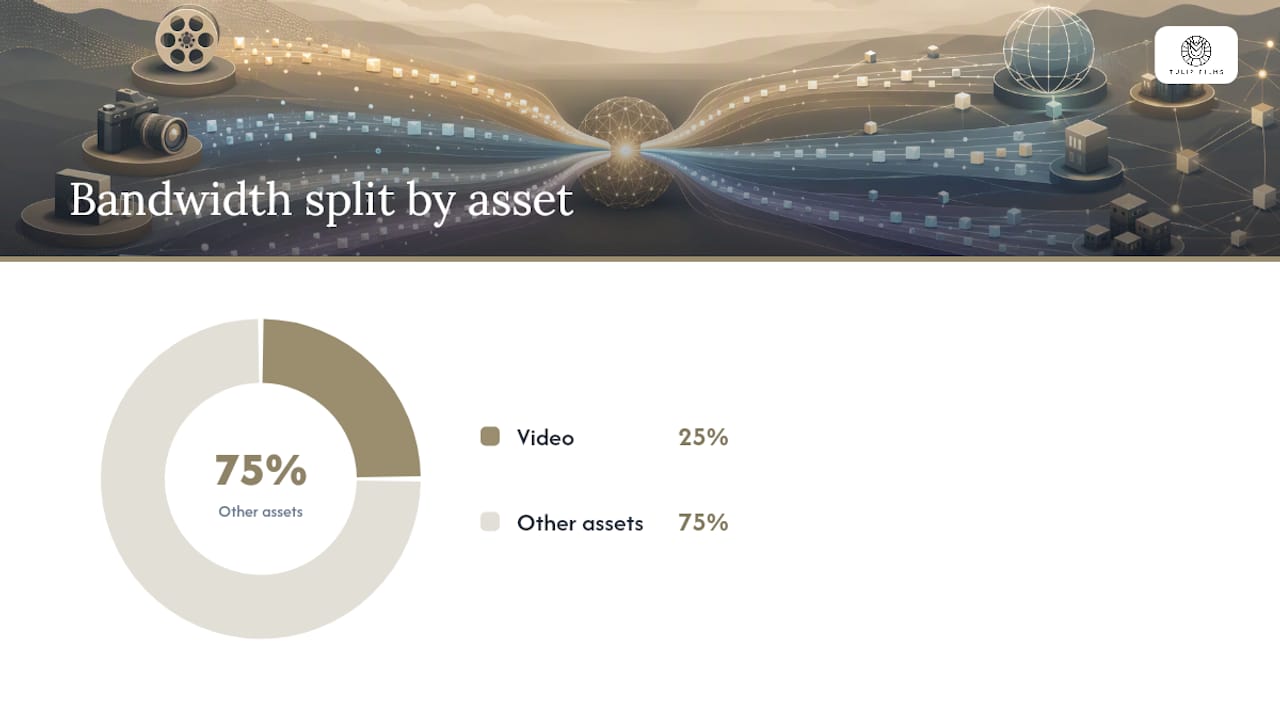
Since video often makes up roughly a quarter of a site’s total bandwidth, these delivery choices compound: a well-compressed file served with the wrong preload setting still loads slowly, and a poorly compressed file served well still costs your visitor data. For anything watched repeatedly by a large audience, adaptive streaming through HLS or DASH lets the player switch resolution based on real-time connection speed, which static renditions can’t do. Order your source elements smallest file first so browsers pick efficiently, and route everything through a CDN rather than your origin server.
Tools and Workflows: FFmpeg, HandBrake, or Online Compressors
FFmpeg is the right tool when you need reproducible, scriptable pipelines, especially for large files or batch jobs where you’re processing the same settings across dozens of clips. Command-line pipelines guarantee identical output settings every time, which matters once you’re running production at scale rather than a one-off export.
HandBrake gives you the same encoding engine as ffmpeg under a graphical interface, with built-in web presets that are hard to beat for a quick manual export.
Online compressors work fine for a single small file under roughly 200 MB, but factor in upload time and think twice before sending anything sensitive to a third-party server.
Hardware encoders like NVENC or VideoToolbox trade a little compression efficiency for a large speed boost, which matters most when you’re churning through volume.
How Tulip Films Approaches Web-Ready Exports
Tulip Films’ standard delivery practice mirrors the checklist above: master the edit in H.264, generate WebM or AV1 variants for the final web build, apply -movflags +faststart on every MP4, and pair hero loops with poster images rather than relying on autoplay alone.
AV1 or HEVC variants get added only when the audience’s device profile and expected view count justify the extra encoding time and cost.
High-repeat content, like a homepage hero or an ad running across many placements, gets the full codec ladder; a one-off internal clip usually doesn’t need it.
Every export gets checked visually on at least two device types before delivery, not just measured by file size.
When to Compress Aggressively, and When Not To
Not every video deserves the same treatment. A muted autoplay background can absorb a CRF in the high 20s without anyone noticing. A hero product shot or an ad running thousands of impressions cannot, since every artifact gets seen thousands of times over.
Match your settings to the viewing context, not a universal default. Test on the actual devices your audience uses, not just your own laptop screen. If a piece of content will be watched repeatedly at scale, the extra time spent building AV1 or HEVC variants and adaptive delivery pays for itself quickly; for a video seen a handful of times, it rarely does.
— Pieter
Get Professional Help With Web-Ready Video Files
Running your own ffmpeg pipeline works well once you know the commands, but most businesses don’t have the time to test CRF values across a dozen browsers and devices before a launch deadline. Tulip Films handles that entire process as part of production, delivering masters already encoded with multi-codec fallback and CDN-ready settings so nothing gets stuck buffering on a client’s site.
[

That means when a project is finished, whether it’s a corporate promo, an event recap, or a product launch, you’re not left guessing which export settings to use. The files arrive already optimized for the platforms they’re headed to. If you’re planning a recurring project or something with real production value at stake, it’s worth booking a consult and reviewing current packages and pricing before your next shoot.
Sources
FAQ
How Do I Compress a Video for a Website?
Export it as MP4 using the H.264 codec with CRF set between 18 and 28 (23 is a solid default), and always add -movflags +faststart. Add a WebM or AV1 version for further savings if your audience’s browsers support it.
How Do I Compress a Video Small Enough to Email?
Use two-pass encoding instead of CRF, since it targets an exact bitrate rather than a quality level, letting you hit a specific file size like 20 MB reliably. Lower the resolution to 720p or 480p first if the file still exceeds your email provider’s attachment limit.
What Actually Happens When You Compress a Video?
Compression discards some visual information the encoder predicts you won’t notice, trading file size for a small amount of quality. Push the CRF too high and you’ll start seeing blocky artifacts, especially in fast motion or dark scenes.
How Do I Compress a Video File Larger Than 1 GB?
Run it through ffmpeg with a moderate CRF around 23 and the medium or slower preset, which usually brings large source files down dramatically without visible quality loss. For files that still need to hit a hard size cap, use two-pass encoding at a calculated target bitrate rather than guessing with CRF alone.
Recommended
