How to Storyboard Videos for Engaging Client Content
- Pieter Nijssen

- Jan 2
- 8 min read

Most marketing managers are surprised to learn that video content can improve client engagement rates by up to 80 percent when supported by strategic storytelling. For Swiss businesses aiming to stand out in a crowded market, understanding what makes an american brand memorable can offer valuable lessons. This guide breaks down practical techniques to define your message, connect with specific audiences, and ensure every frame of your next professional video makes a lasting impression.
Table of Contents
Quick Summary
Key Point | Explanation |
1. Define clear objectives | Establish specific goals that align with audience needs to drive effective storytelling. |
2. Organize visual flow logically | Structure your narrative to enhance coherence and audience engagement through smooth transitions. |
3. Create detailed storyboard frames | Sketch out individual shots with important details to communicate the emotional tone and actions clearly. |
4. Integrate branding consistently | Embed brand elements and messages throughout the storyboard to reflect your unique identity and engage viewers. |
5. Conduct thorough storyboard reviews | Review frames for clarity and alignment with the overall message to ensure effective communication and storytelling. |
Step 1: Define key objectives and target audience
Successful video storyboarding starts with crystal clear objectives and a deep understanding of your target audience. You want to create a roadmap that speaks directly to the people who matter most to your project.
Begin by conducting thorough audience research. Understanding your audience’s prior knowledge and goals is crucial for crafting a compelling narrative. Break down your potential viewers into specific segments using categories like demographics, professional roles, geographic location, and lifestyle characteristics. Are you targeting Swiss marketing managers at mid sized companies? Startup founders? Corporate executives? Each group will require a different storytelling approach.
Next, align your video objectives precisely with audience needs. Effective communication demands segmenting the audience by relevant categories and understanding their core values. Ask yourself key questions: What problem are you solving? What emotional response do you want to trigger? What specific action should viewers take after watching? These questions will help you craft a focused storyboard that resonates powerfully with your intended viewers.
Pro Tip: Create a detailed audience persona document with specific traits, challenges, and motivations to guide your entire storyboarding process.
Step 2: Organize story structure and visual flow
Creating a compelling video narrative requires strategic planning and thoughtful organization. Your goal is to transform raw ideas into a coherent visual journey that captivates your audience from start to finish.

Storyboarding helps teams explore and communicate interactions by visually documenting scenarios through a systematic approach. Break your story into individual scenes, each with a clear purpose and emotional progression. Start by mapping out key narrative beats like the introduction, conflict, climax, and resolution. Think of these as the skeleton of your video skeleton that will later be fleshed out with specific visual and audio elements.
When structuring your visual flow, consider how each scene connects to the next. A well-constructed storyboard structures content in a logical sequence, ensuring smooth transitions between segments. Sketch out rough scene compositions, noting camera angles, character movements, and critical visual details. Focus on creating a narrative that maintains viewer engagement while clearly communicating your core message. Pay attention to pacing and emotional rhythm the way a musician might compose a song.
Pro Tip: Create a storyboard template with predefined boxes for each scene, allowing you to quickly sketch and rearrange visual sequences while maintaining a consistent storytelling framework.
Step 3: Sketch frames and add shot details
Transforming your video concept into visual reality begins with creating detailed storyboard frames that capture the essence of your narrative. This step is where your creative vision starts taking concrete shape.
Storyboarding involves sketching sequences of images that represent moments to be filmed, so focus on clarity over artistic perfection. Each frame should represent a specific shot or scene, including key details about camera angles, actor positioning, and critical visual elements. Draw simple stick figures or basic shapes that communicate the core action and emotional tone of each moment. Annotate your sketches with notes about dialogue, movement, and specific visual intentions to ensure your production team understands the exact mood and direction you want.
Sketching frames requires capturing key moments with descriptive annotations that explain the user’s emotional journey. Think of each frame as a snapshot that tells a piece of your larger story. Include details like actor expressions, background elements, and specific visual cues that will help convey your narrative. Remember that these initial sketches are a communication tool designed to align your entire production team around a shared creative vision.
Pro Tip: Use colored pencils or digital tools to differentiate between shot types like wide angles, close ups, and tracking shots directly on your storyboard frames.
The following table distinguishes between three common video shot types used in storyboarding:
Shot Type | Main Purpose | Common Usage Scenario |
Wide Angle | Establish setting, context | Opening or transition shots |
Close Up | Show emotion, detail | Highlight reactions |
Tracking Shot | Follow movement, add energy | Action or dynamic scenes |
Step 4: Integrate branding and communication cues
Bringing your brand story to life requires thoughtful integration of visual and narrative elements that communicate your unique identity. Your storyboard is more than just a sequence of images it is a strategic communication tool that reflects your brand’s core message.
Integrating branding into storyboards involves embedding communication cues that reflect brand values, tone, and identity consistently throughout the visual narrative. Start by establishing your brand palette directly within your storyboard frames. This means incorporating specific color schemes, typography, logo placement, and visual motifs that are instantly recognizable to your audience. Consider how each frame can subtly reinforce your brand personality through visual language whether you are aiming for a professional corporate feel or a more dynamic and energetic approach.
A well-developed storyboard ensures that visuals and narrative align with the intended audience’s expectations and the brand’s identity. Pay attention to the nuanced details that communicate your brand story. This might include selecting imagery that resonates with your target demographic, using language that matches your brand voice, and creating visual transitions that feel inherently connected to your brand aesthetic. The goal is to create a cohesive narrative where every visual element works together to tell a compelling and authentic brand story.
Pro Tip: Create a brand style guide reference sheet to keep alongside your storyboard to ensure consistent visual and tonal alignment across all frames.
Step 5: Review storyboard for clarity and alignment
The final stage of storyboarding is a critical evaluation process that transforms your initial concept into a polished visual narrative. Think of this review as your quality control checkpoint where every frame gets scrutinized for maximum impact.
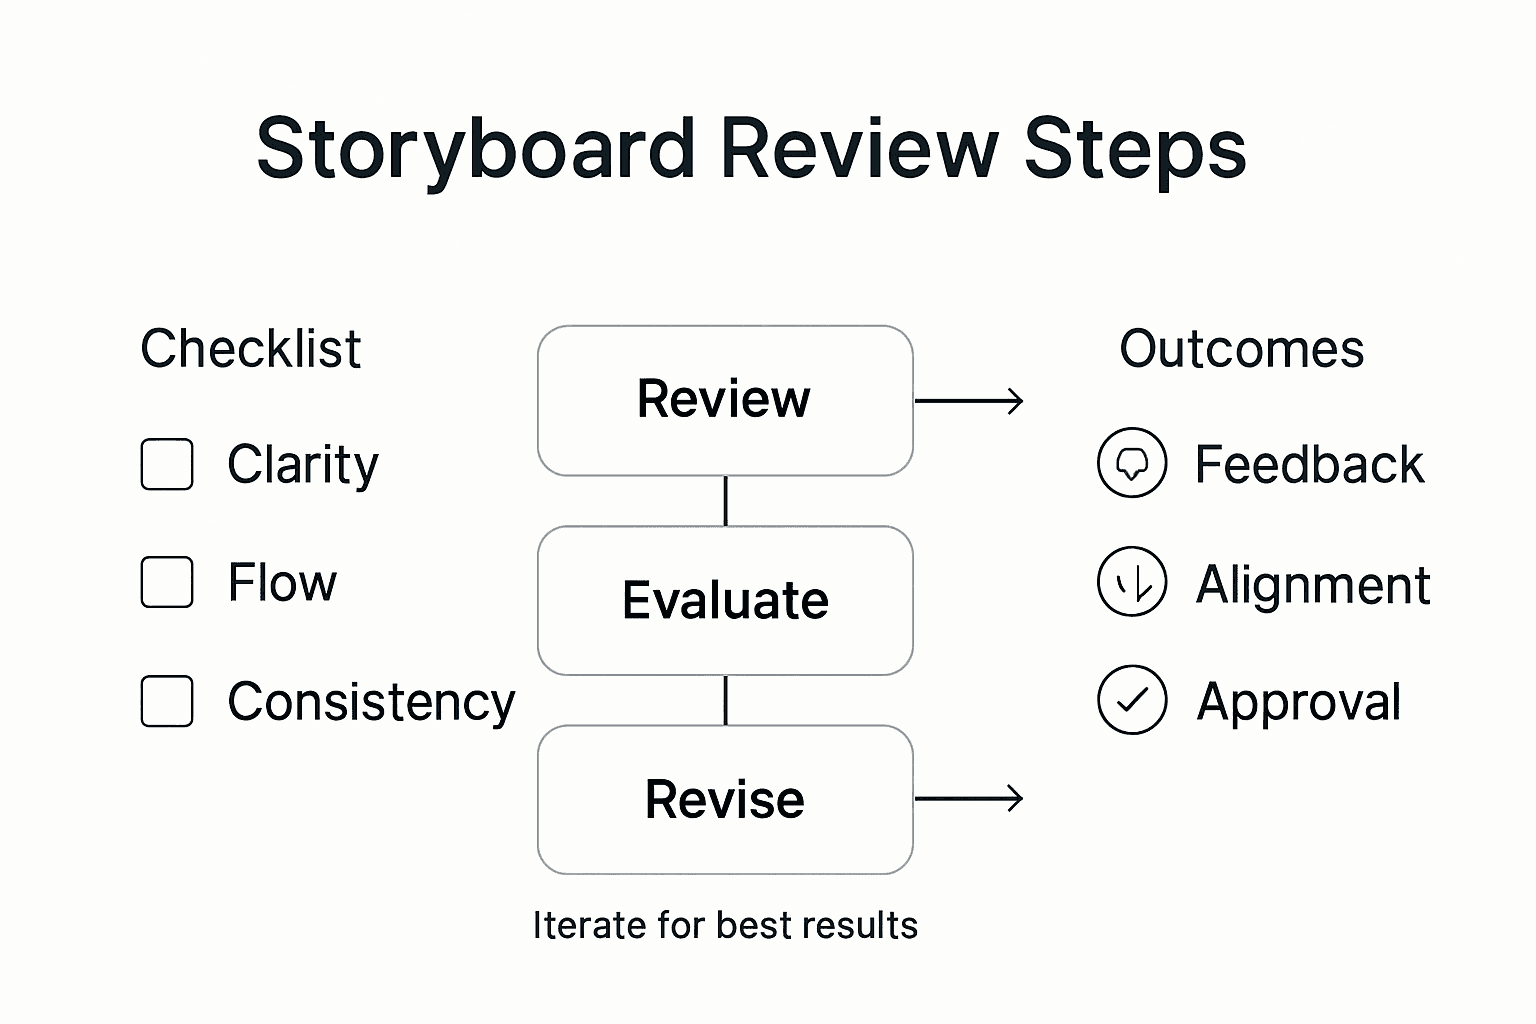
Reviewing a storyboard is an iterative process involving feedback from team members and stakeholders to ensure the narrative clearly conveys the intended message. Gather your production team and walk them through each frame systematically. Look for potential gaps in storytelling, moments where the emotional arc might feel disconnected, or scenes that do not quite communicate your intended message. Be prepared to challenge your initial assumptions and welcome constructive critique that can elevate your visual storytelling.
Effective storyboard review includes presenting to the team to gather diverse feedback and uncover potential misunderstandings. Pay special attention to how well your visual sequence maintains narrative flow and whether each frame contributes meaningfully to the overall story. Ask critical questions like: Does this scene advance the story? Is the visual communication clear? Would an audience unfamiliar with the project understand the progression? This thorough examination ensures your storyboard becomes a precise communication tool that resonates with your intended audience.
Pro Tip: Create a standardized review checklist with specific criteria for evaluating each storyboard frame to maintain consistency and objectivity during the review process.
Here’s a summary of key storyboard review checkpoints and their purposes:
Review Checkpoint | Purpose | Outcome |
Identify gaps | Ensure complete story coverage | Fewer confusing scenes |
Test emotional arc | Maintain consistent viewer engagement | Strong emotional journey |
Clarify visual message | Guarantee message is easily understood | Clear communication |
Gather team feedback | Integrate diverse perspectives | Improved final storyboard |
Bring Your Storyboard to Life With Expert Video Production
Crafting a clear and engaging storyboard is the foundation for videos that truly resonate with your audience. The challenge many face is turning this strategic plan into compelling visual content that holds attention and delivers your message with impact. If you struggle with organizing a smooth visual flow or integrating your brand identity seamlessly, you are not alone. Key pain points such as aligning storytelling to target audience needs and refining emotional pacing require professional skill and experience.
At Tulip Films, we specialize in transforming your detailed storyboards into high-quality videos tailored to your unique goals. Our Swiss-based production team understands the importance of focusing on clarity, brand consistency, and emotional engagement from concept to final cut. Whether you need corporate videos that connect with executives or promotional ads that energize your market, our personalized approach ensures your narrative shines. Explore examples of our work and discover how we combine expert storytelling with flawless execution at Tulip Films.
Planning your next video project starts with a focused storyboard and ends with stunning visuals.
Ready to take your storyboard off the page and into a captivating video?
Bring your vision to life with Tulip Films today and secure your free consultation for a bespoke audiovisual solution crafted exactly for your audience and brand.
Transform your storyboard into a compelling video now.
Discover our tailored video production services and start engaging your clients like never before.
Frequently Asked Questions
How do I define my video’s objectives for storyboarding?
To define your video’s objectives, clearly state the problems you’re addressing and the emotions you want to evoke. Create a list of specific actions you want viewers to take after watching to help guide your storyboarding process.
What steps should I take to research my target audience for effective storyboarding?
Conduct thorough audience research by breaking down potential viewers into segments based on their demographics, roles, and motivations. Use a persona document to outline their key traits and challenges, which will inform your narrative approach.
How can I ensure my video storyboard has a coherent structure?
Ensure your storyboard has a coherent structure by breaking your story into clear scenes and mapping out narrative beats like the introduction, conflict, and resolution. Use rough sketches to visualize transitions and maintain logical sequences between each segment.
What details should I include when sketching my storyboard frames?
Include key elements such as camera angles, character positions, and emotional tones in your storyboard frames. Use simple sketches combined with annotations to provide clarity on movements and dialogue, ensuring your production team understands your vision.
How do I integrate branding effectively into my video storyboard?
Integrate branding into your storyboard by embedding visual cues like color schemes, logos, and typography that reflect your brand’s identity. Ensure that each frame consistently communicates your brand message and resonates with your target audience’s expectations.
What should I focus on during the review of my storyboard?
During the review of your storyboard, focus on identifying any gaps in the story, testing the emotional arc, and clarifying the visual message. Gather team feedback to refine the storyboard, ensuring it clearly communicates the intended narrative.
Recommended
